Notated sheet music out in the world, in my experience, tends to be about 2% fully professional, 8% good enough, and 90% on a scale of annoyingly flawed to catastrophically broken. Which category do your parts fit into? Here are 10 easy changes you can make to your parts to make you look more professional. They’re small and simple adjustments that improve the quality of your parts disproportionately to the effort put into adding them.
1. Use readable fonts
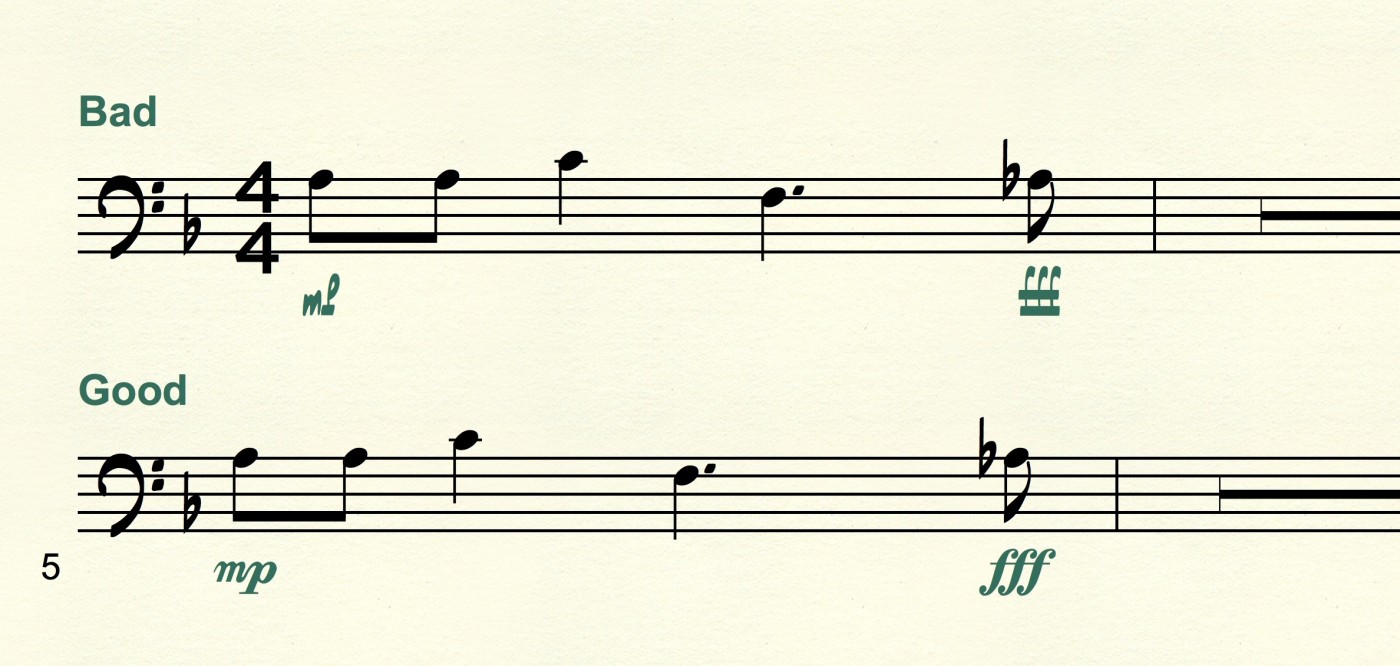
The default jazz font in Finale is fine for notation, but terrible for text. Jazz font dynamics and numbers look especially sloppy and unprofessional. Maestro or something else is a big step up.
This goes for chord symbols and measure numbers as well.
Ugly fonts that are hard to read

Nicer fonts that are much easier to read
A clean font makes all the difference in legibility and sightreading morale.
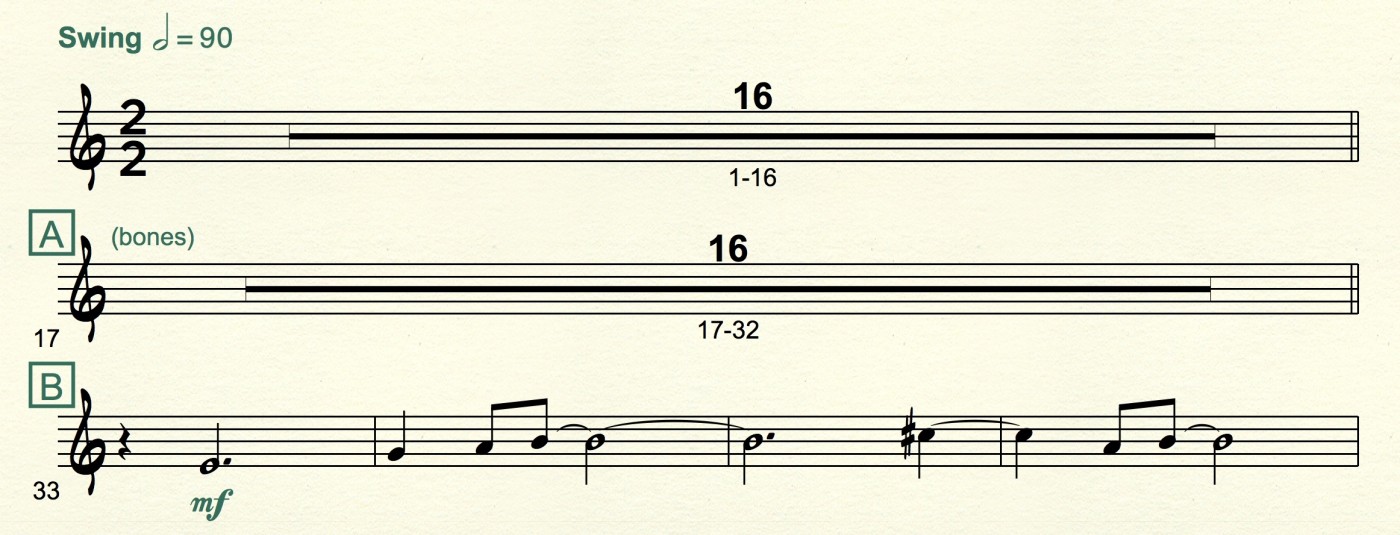
2. Add measure number ranges to multi-measure rests
This small detail can help make the difference between a perfectly smooth rehearsal and one with a series of small delays that frustrate people and waste time. It gives your brain the good kind of extra information and gives a little assistance to people who process things more visually. Finally, using the below example, if a director calls to start at bar 41, it’s much easier for the player to find that.
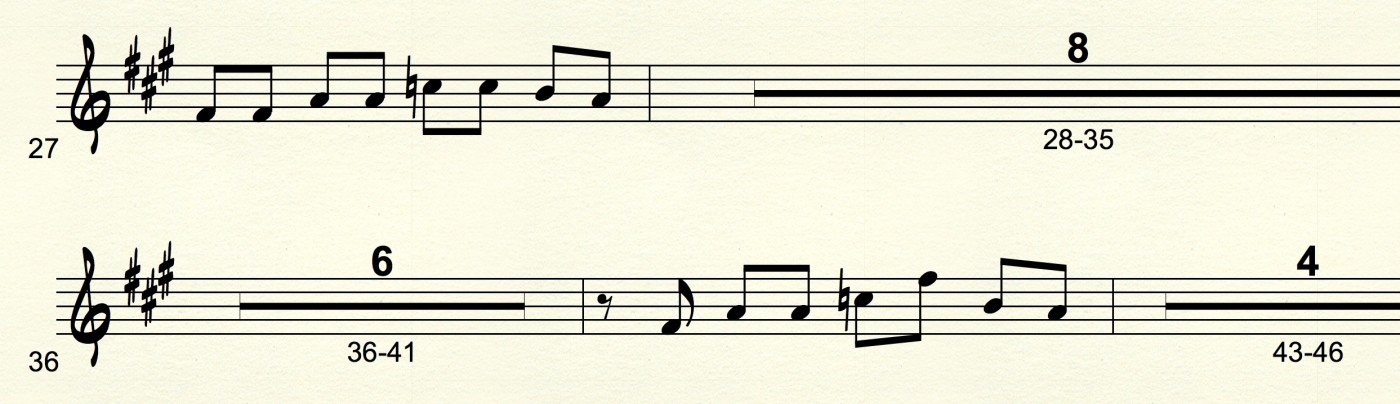
Once you set it up in your templates, you’ll never have to deal with it again, and the time you can save other people is more than worth it.
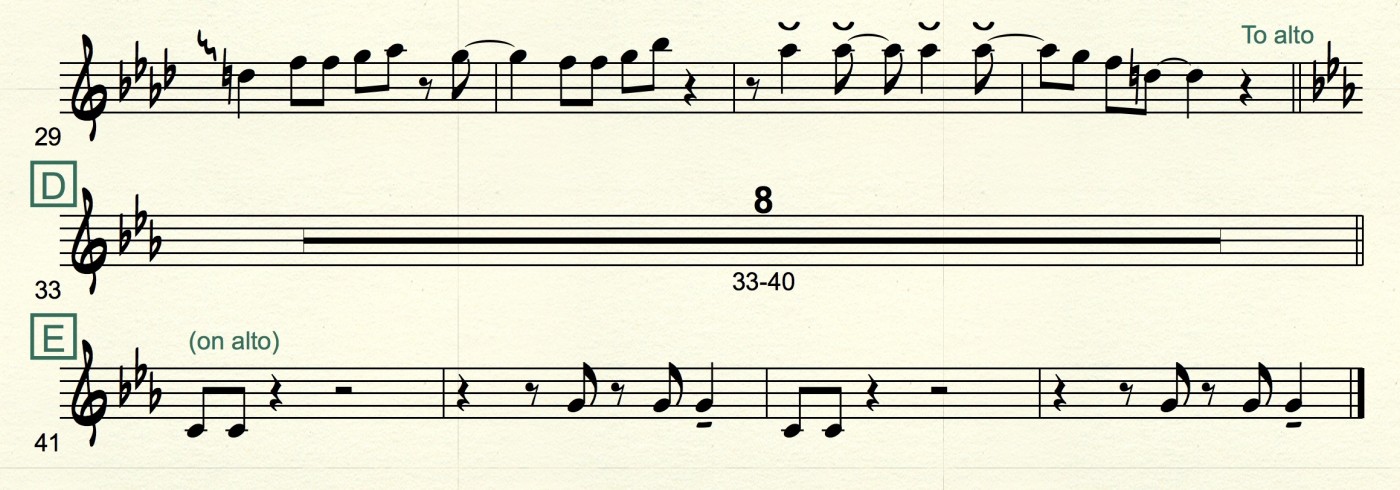
3. Indicate instrument changes early
Brass mutes, woodwind doubles, percussion section changes, and anything else involving a physical change, need to be indicated at the player’s first possible opportunity to comply. As a trumpet player, more times than not I’ll get notified to use a mute at the exact moment I need to use the mute. This gives me literally no time to make the physical adjustment. I see it in nearly every musical theater score and in most big band and commercial music part.

Don’t do this

But absolutely do this
Sometimes it’s the difference of a bar or two, but get into the habit even if it is. It’s a change of habit that takes no extra time but can make a piece sightreadable or not.
Now, there is one big advantage to writing the change at the last moment, and that is for a band that heavily rehearses. If the director calls out Letter M, and that’s a passage that starts with a flute double for the tenor sax, for them to see that indication right away lets them switch to the correct instrument immediately. Most bands I work for are sightreading-only bands, so the first-possible-moment style is how I do things. But many bands still rehearse, and for them, the last-possible-moment method is the way to go.
The extra reminder at the last moment is helpful for rehearsing
Know your audience.
In general, before you make parts, sit down with each one and sing it and physically mime it, even if you don’t play the instrument. Doing this will help you catch possible logistical issues, and soon you’ll have a sixth sense for navigating them with ease.
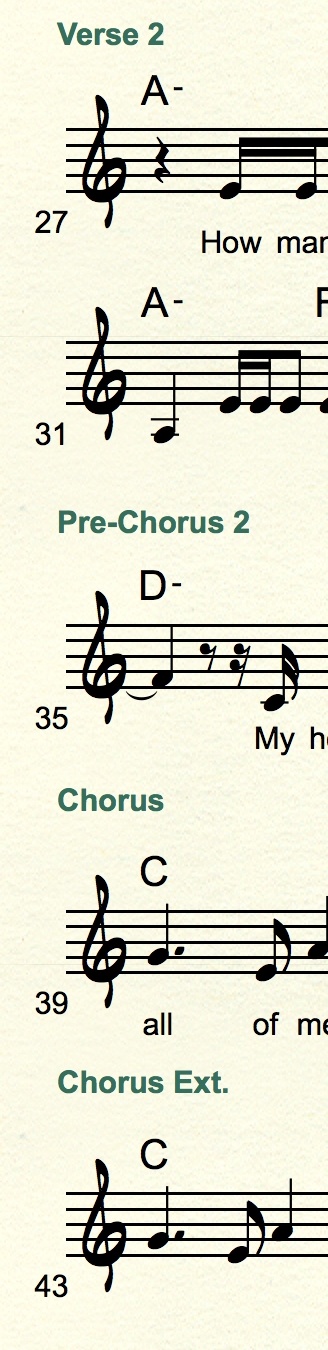
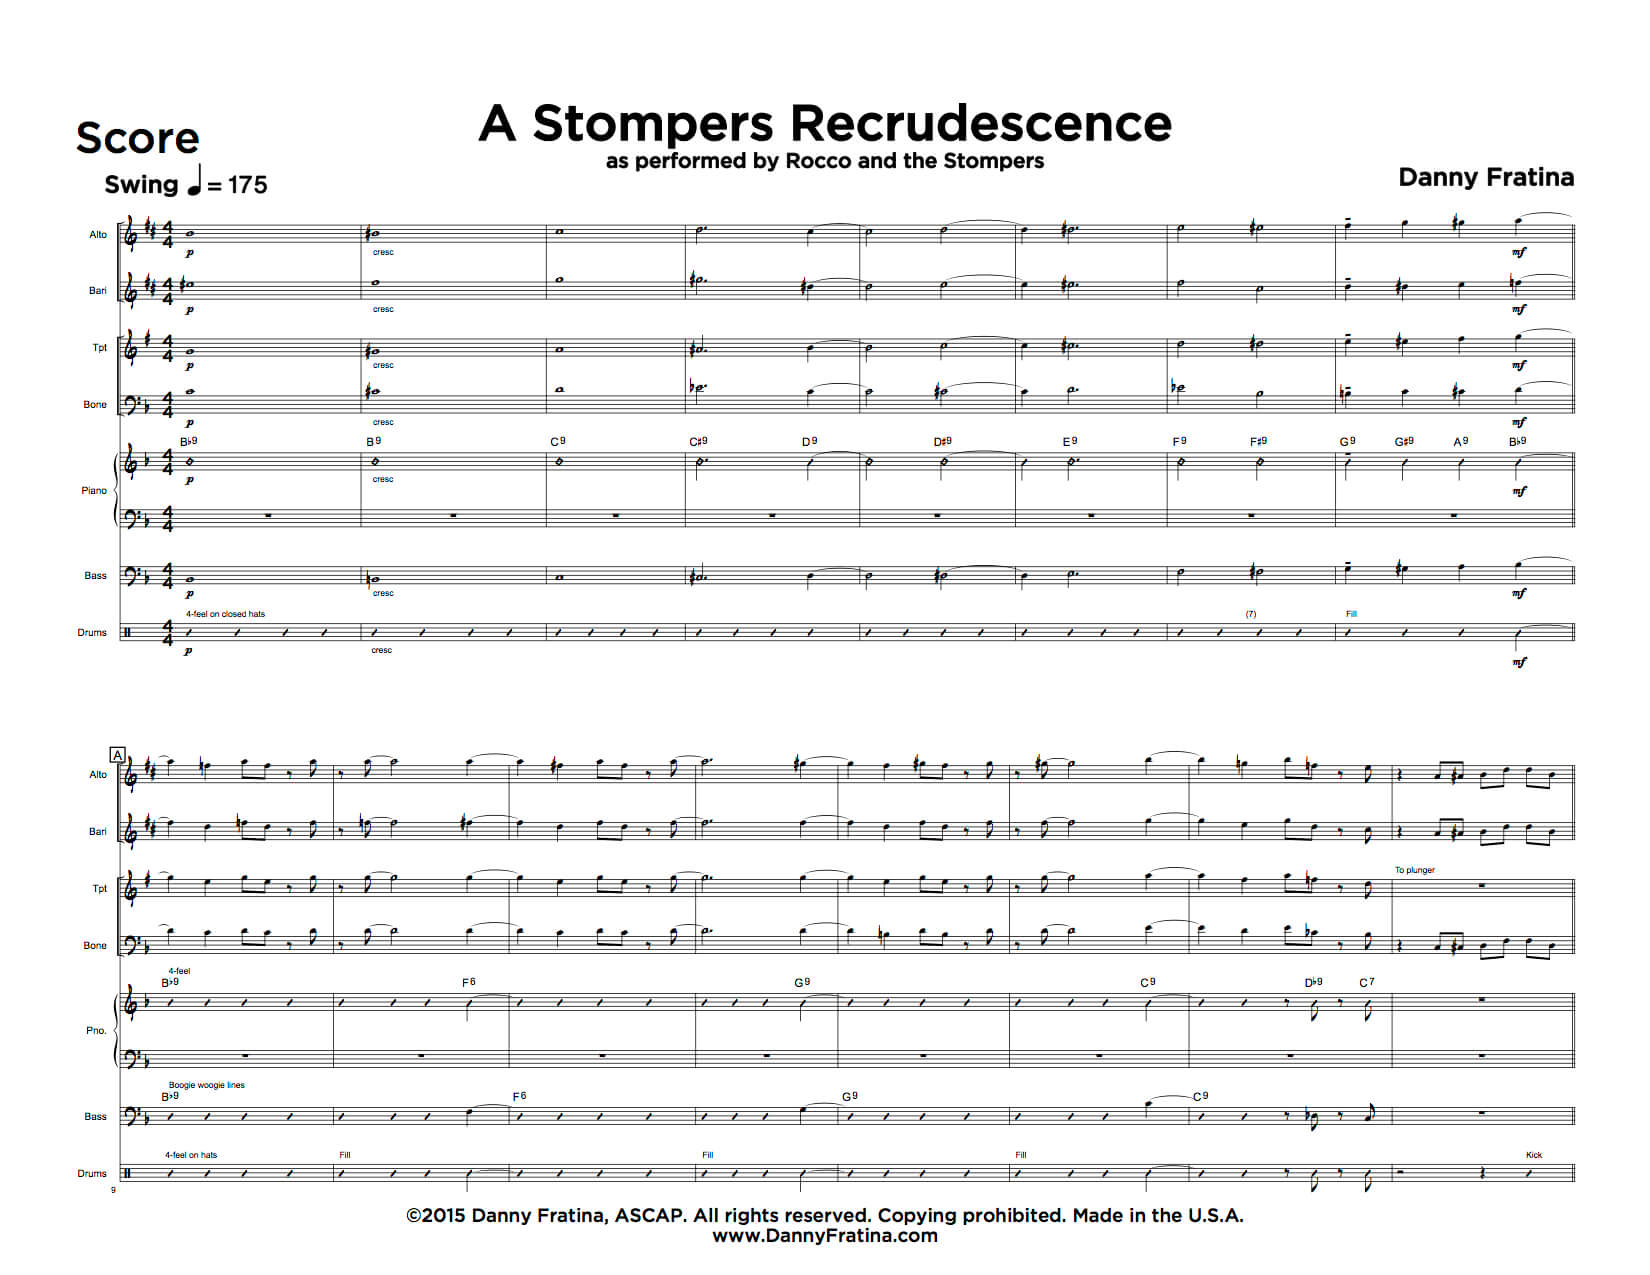
4. Use more/better rehearsal letters
A typical dance band arrangement might have around three choruses. Sometimes I’ll see only two or three rehearsal letters, indicating the start of each chorus. Go further! If it’s a 32-bar AABA form, add a letter every 8 bars. Add one for the 4-bar interlude. Add one for when the tag ending feels like it clicks into place. Pair up every rehearsal letter with a double bar line to help draw the eye’s attention to the fact that a new phrase starts here.
And be smarter with them. We never want to see Chorus 2 and Verse 3. There is no advantage to that. If you write Verse 3 and call it in rehearsal, I now have to search the entire piece because there is nothing inherently orderly about Verses and Choruses the way letters and numbers are. Verse 3 could be early in the arrangement or later. It could be after Verse 2, Chorus 1, or Bridge. Don’t use them.
this is annoying
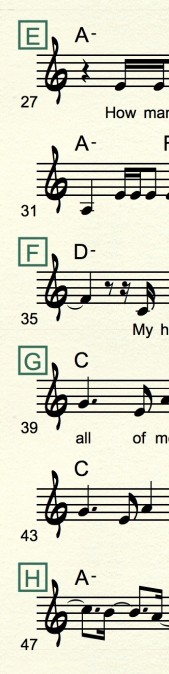
this is much better
Also consider not using bar numbers for your rehearsal markings. I’m not opposed to numbers, but I think letters are better. While bar numbers can get into the hundreds and take up extra space on the page, letters are single characters, and even arrangements with thousands of bars virtually never would use more than two characters per rehearsal letter. Additionally, think about how easy it is to call out “RR” or “double R” compared to calling out “bar one thousand and forty one.” The latter is a mouthful and requires more attention from the player in rehearsal. We’re talking about microseconds of time here, but if you want professional, this is the way to go. Besides, it’s less about the time and more about the potential for error, as more numbers called increase the chances of mishearing.
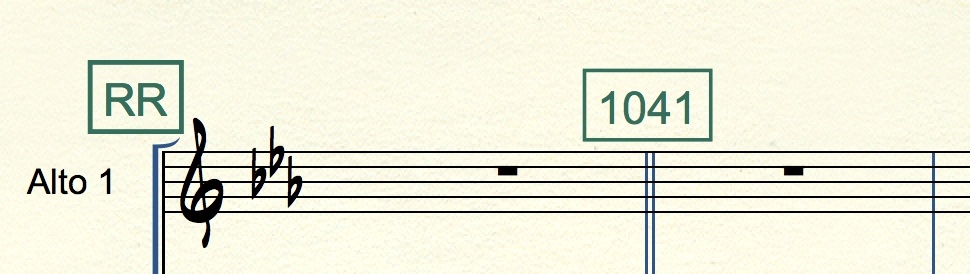
At the end of the day, it takes up less space and conveys the same necessary information, which gives it the edge for me, easily. If you have good measure numbering to coincide with good rehearsal letters, you have multiple ways to rehearse and sightread effectively and efficiently, while taking up the least amount of space possible.
Final note: whenever possible, align and space your music so that the rehearsal letters are on the far left side of the page.

try not to do this
this is good though
If you are consistent with this, players will always put their eyes into a single leftward column to search down for the letter they need. if you put your letters throughout the piece, you are forcing players to search a sea of music to find their target. Make life simple and columnize your letters.
5. Add helpful text
Always give the players more information rather than less. If trumpet 2 is playing lead while trumpet 1 rests for 8 bars, let trumpet 2 know.

Remember, your worst case scenario is that the piece you write gets zero time for rehearsing. You might even think that you know you’ll get rehearsal time, but what if someone sends a sub last minute because of illness or there is a schedule mix up? What if there is a bad storm and you have to forego rehearsing?
Talk to your players through the parts, not through rehearsal. If you need them to change mutes with 3 seconds of time to spare, write “To straight mute QUICK”. If you have a grand pause, let people know, especially your drummer, who you don’t want to take the risk of them playing through thinking they have to fill.
Tell your rhythm section players who is soloing so they know what is happening across the stage and can make adjustments to improve the music. If there is a large field of rest for a horn player, help them count by telling them what they should be listening for, like solos or sections
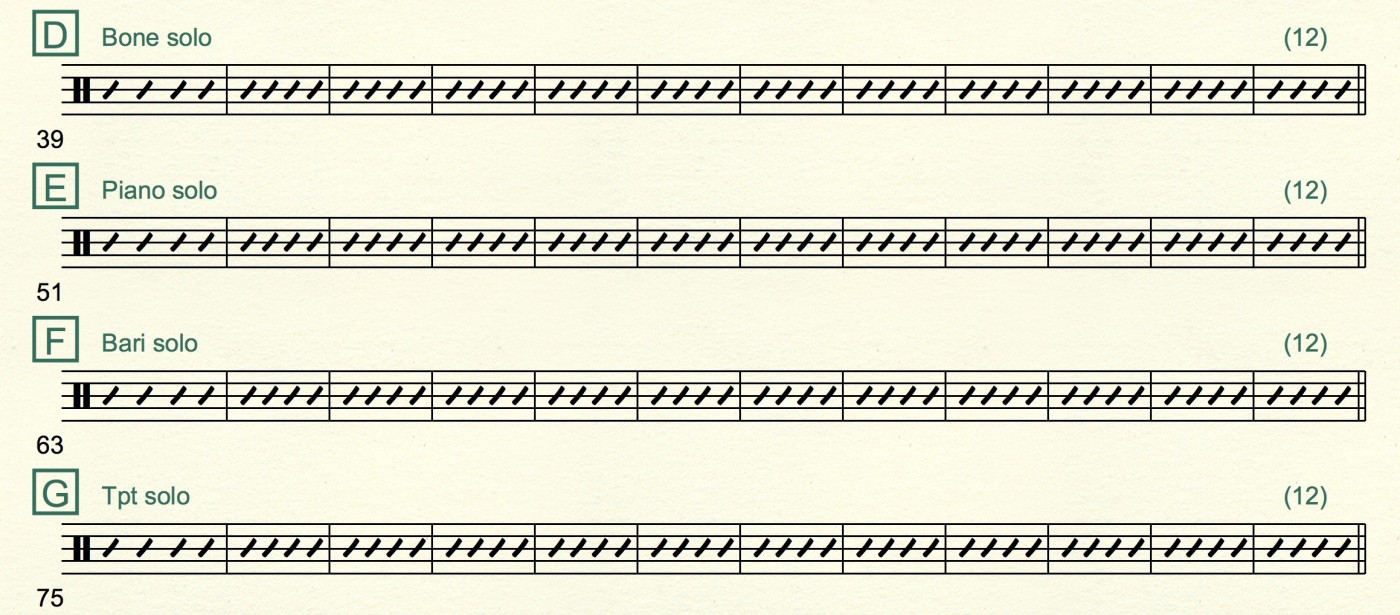
The more information, the better. The above image also includes info from the next tip:
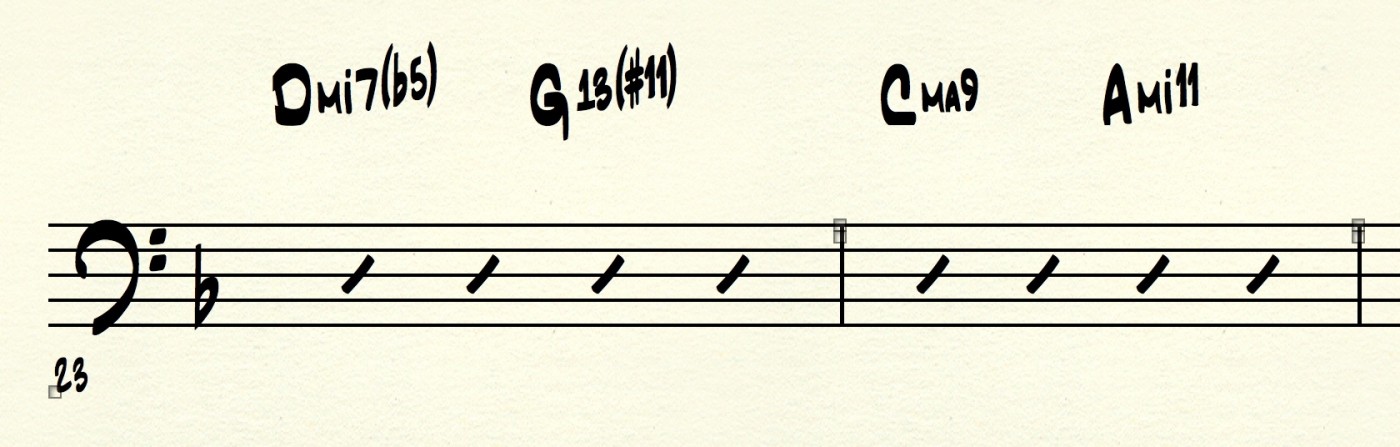
6. Add measure counts to the drum part
This is a simple one. After 8 bars go by of just slashes, put an “8” above the 8th bar. This helps your drummer immensely. They can look ahead, see the 8, count on their own and focus on the music. The alternative is that your drummer will be counting every single bar, line by line, and it’s a ton of work that is prone to error.
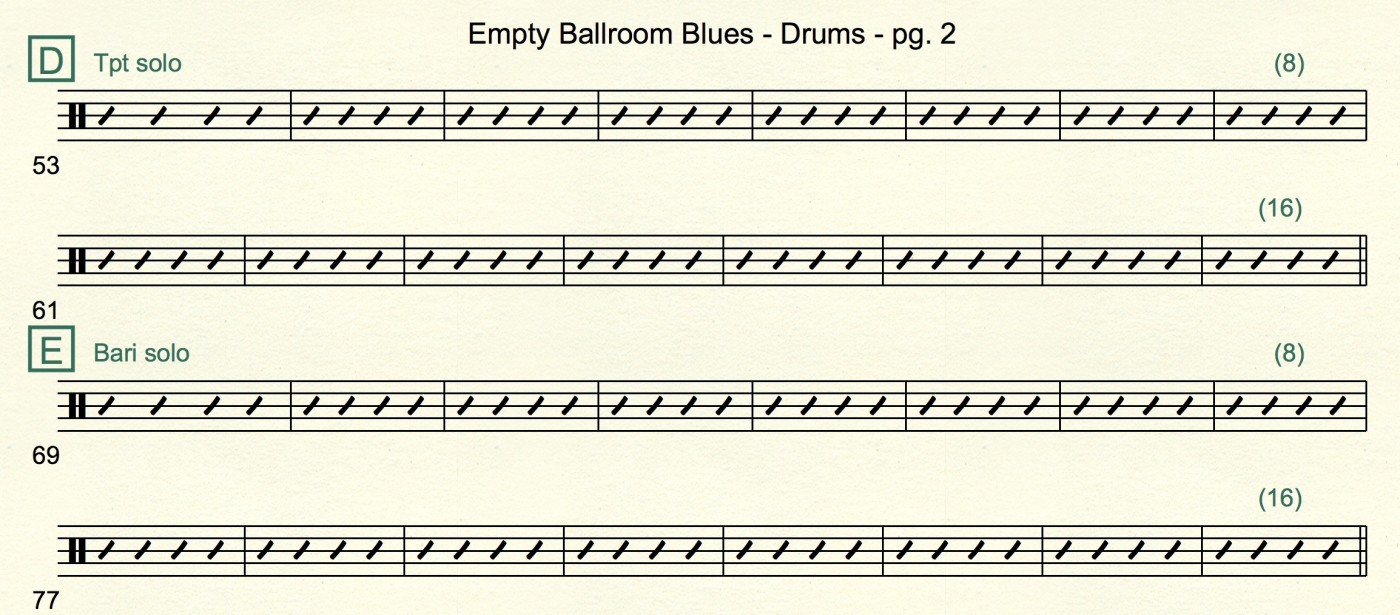
The more information like this you add, the easier the drum part is to sightread and the less likely you’ll encounter a reading error.
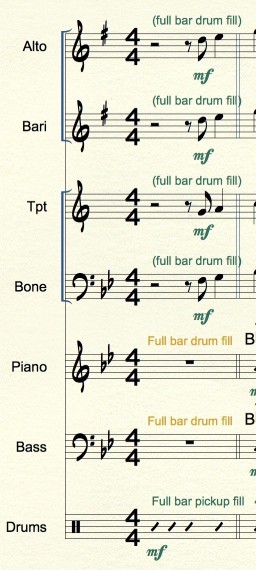
7. Make your first and last bars crystal clear
If your first bar is a pickup, make it an obvious pickup that is consistent across the band parts. If it’s just an 8th note and you write it as a full bar, 9 times out of 10 I would anticipate a trainwreck beginning—half the band would start counting on what appears to be beat one, which is rest, while the other half interprets the note as a pickup.
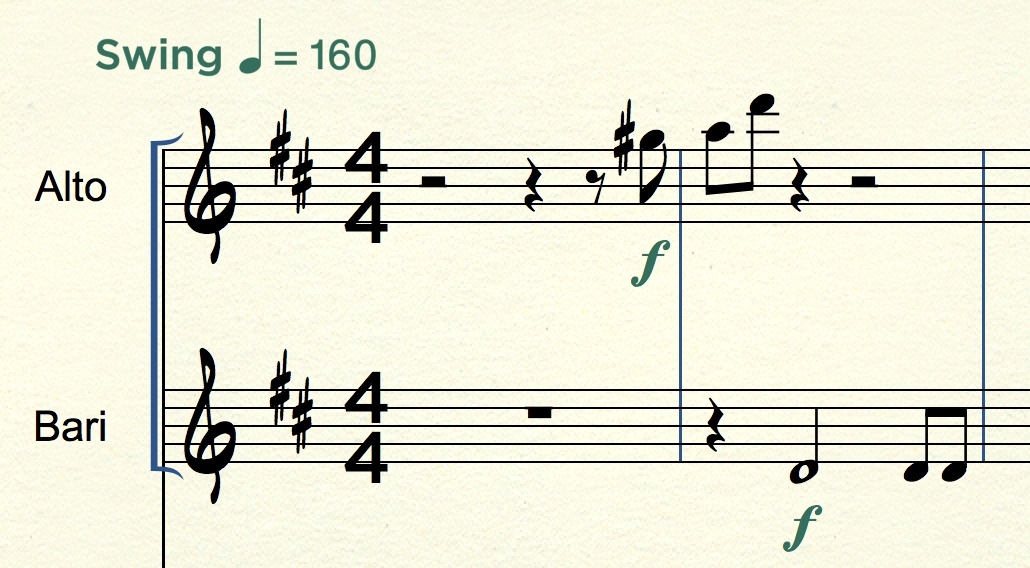
This example is almost guaranteed to sound calamitous upon count off. The way to improve it is as such:
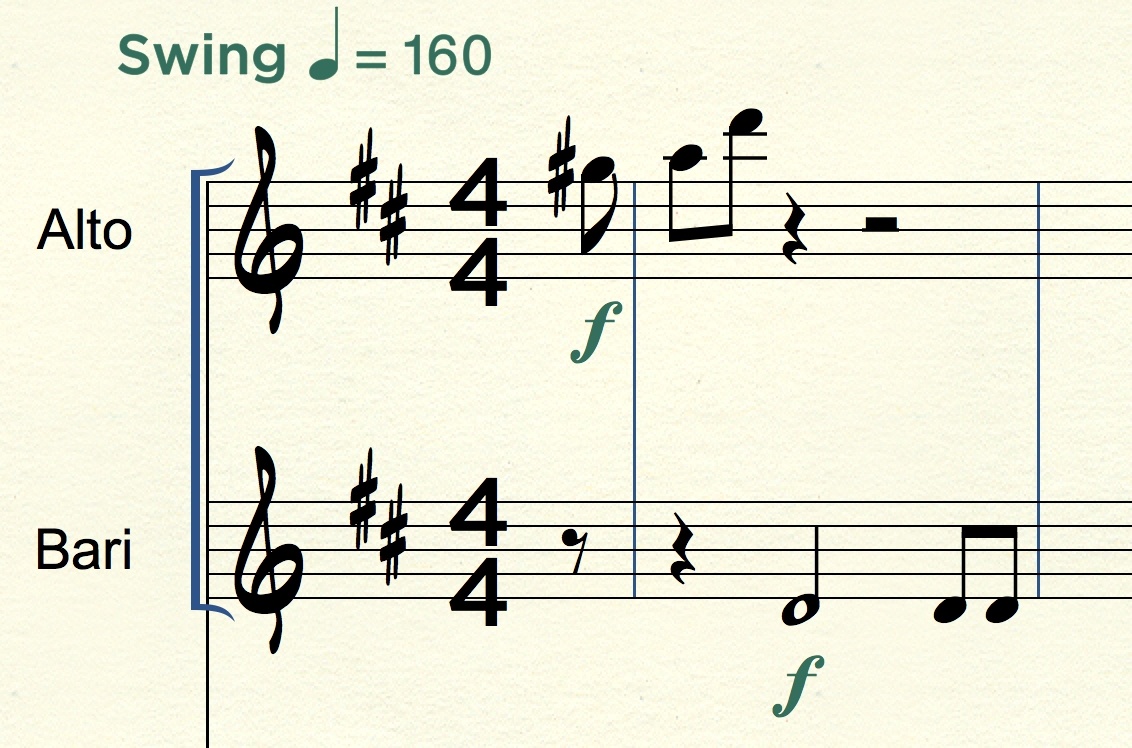
Sometimes a piece has an actual full bar pickup, so anticipate potential sightreading problems and indicate “full bar pickup”. If the drums do a full bar solo picture, write that out!
For the final bar, avoid extra blank bars. This is a common oversight and it generally doesn’t hurt, but it looks unprofessional and in rare cases can sour band morale if the players all focus for a final bar waiting for something to happen. The worst offender, which I like to call the Berklee Project Band Special, includes a lone empty bar on a lone final page. It’s a waste of paper, sets up players for a potential horn-in-hand page turn, and looks ridiculous.

bonus points if you print that last page out landscape
Don’t bamboozle your players.
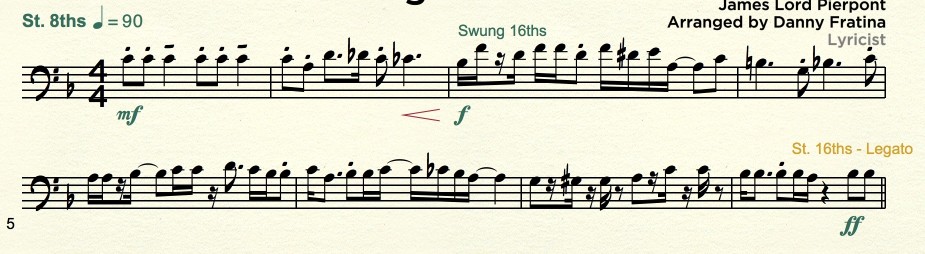
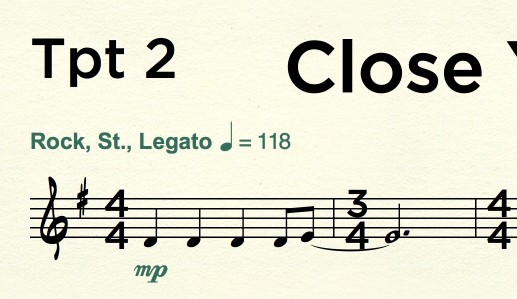
8. Put more information in the tempo expression
This is small but sometimes huge. If your piece swings, write swing. Every time. If it’s straight 8ths, write it. If it’s straight 8ths and 16ths, write it. If it’s reggae with swung 16ths, write it. If it’s classical and marcato, don’t just write “straight 8ths.” Write “Straight 8ths, Marcato.” Give as much information as possible here while also being as succinct as possible.
I played in a band that had a book of mixed-era pop music. We played a string of swinging jazz tunes in a row, then got to an arrangement of Another One Bites the Dust. There was no tempo indicator. The tuba player was unfamiliar with the song (classical musicians am I right?), so when the trombone player band leader counted it off, the tuba player started swinging the line. We had no choice but to follow him, even though some of us tried, in vain, to straighten it out.
Five years later, the band still swings Another One Bites the Dust. New players come and go and find themselves confused and musically unsatisfied, but the regulars in the band are now stuck in their ways. A single “Rock, Straight 8ths” could have fixed everything.
Play it safe and get specific with every single tempo expression.
9. Add the title, instrument, and page number to every page
I often play charts that only have two of these three details. Or one. Or even none. It takes a few seconds to add this info your templates—set it and forget it.

After that, you’ll have extra infrastructure in place to avert potential disaster. Yes, disaster can strike hard without that header information. Here’s how it works:
You write ten arrangements for orchestra and you spend an entire Tuesday printing the parts out, including 7 copies of violin 1, 5 copies of cello, etc. On Wednesday you wake up early to start folding and taping the parts. You pick the stack up but slip, and the pages fall to ground, sending them flying around your room.
Did you add title/parts/page numbers to everything?
It’s going to be a pain putting things back in order, of course. But one method will take a short amount of time, even allowing you to employ help from a friend, even a non-musician friend, and the other method will take WAY MORE TIME THAN YOU HAVE BECAUSE YOU ARE DELIVERING THE PARTS THIS AFTERNOON AND YOU HAVEN’T EVEN HAD BREAKFAST.
Did I just scare the pants off of you? Yes? Good. Add this information now. This scenario will happen, it’s inevitable, so save yourself the street and take 5 seconds to adjust your templates.
A second benefit is that in the unfortunate case of you taping two wrong pages together, a player can quickly spot that for you and potentially avert disaster before it strikes.
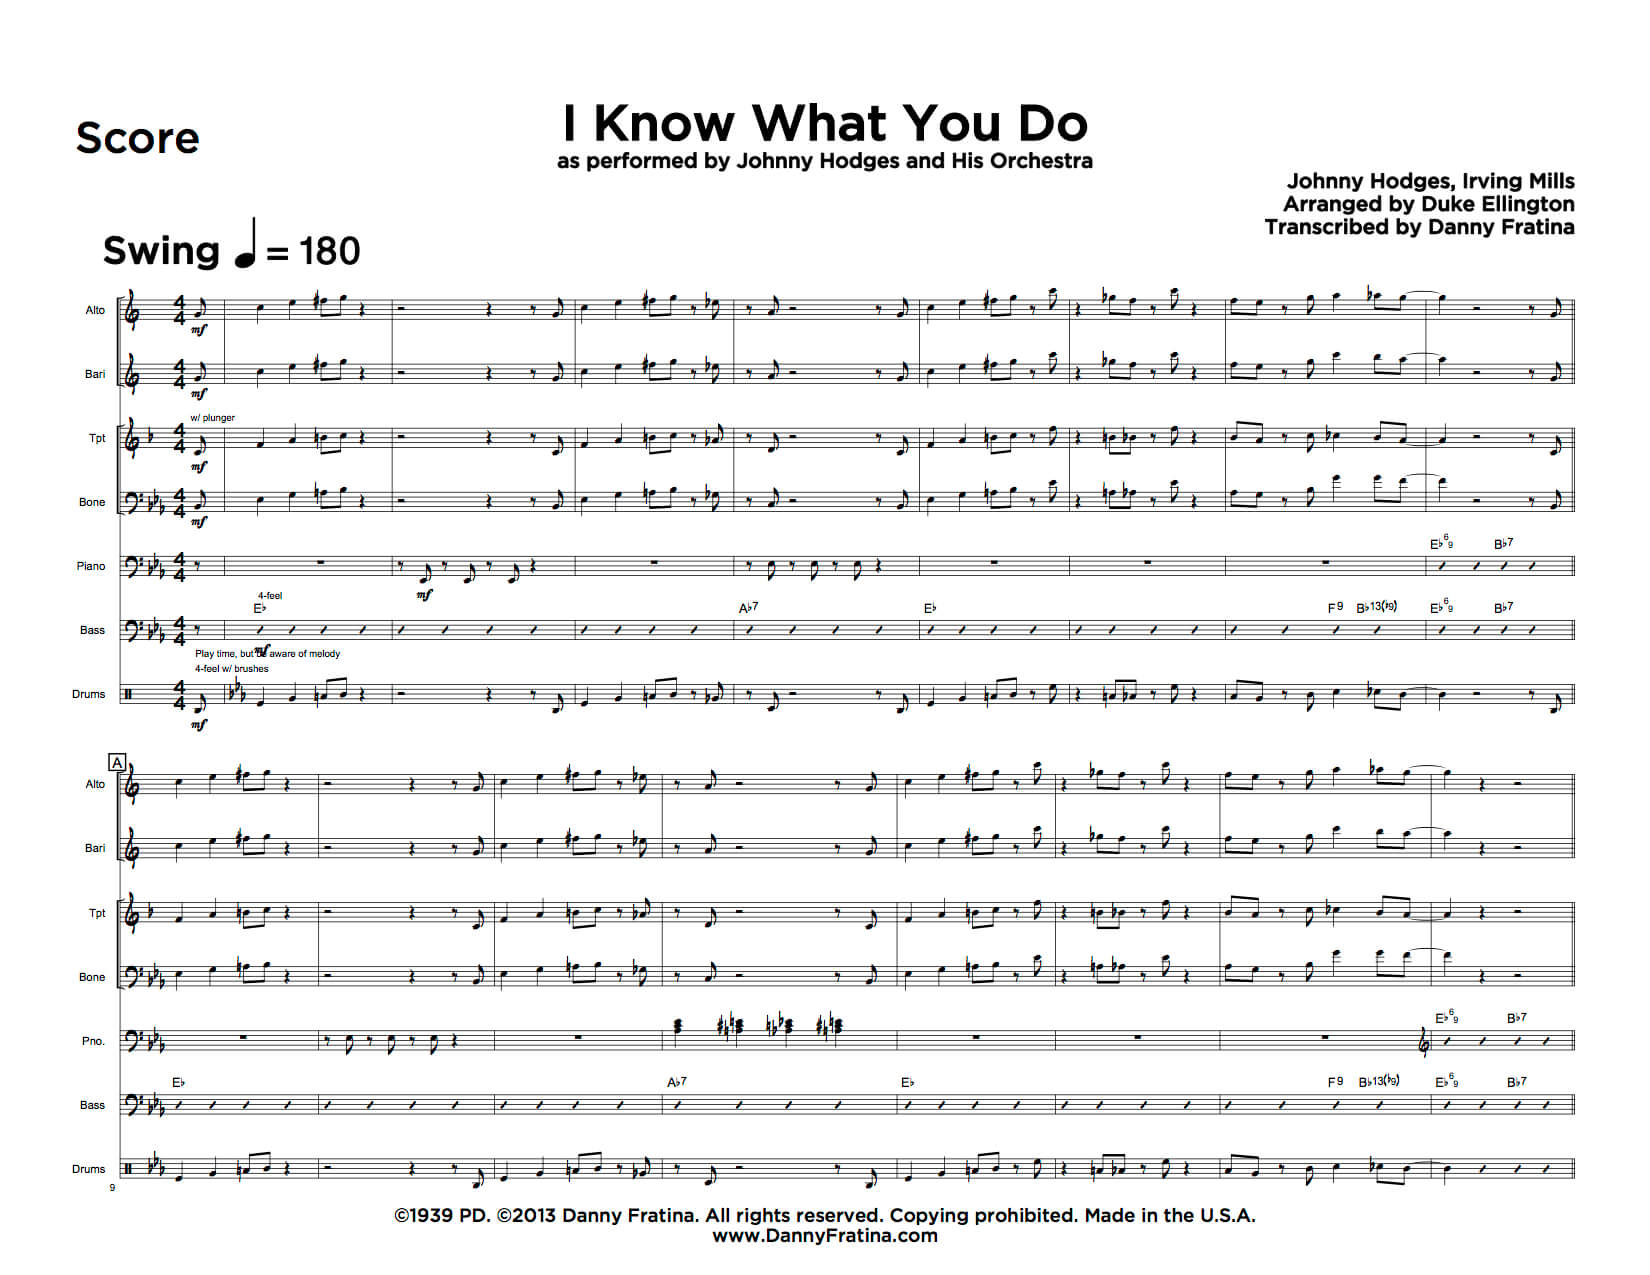
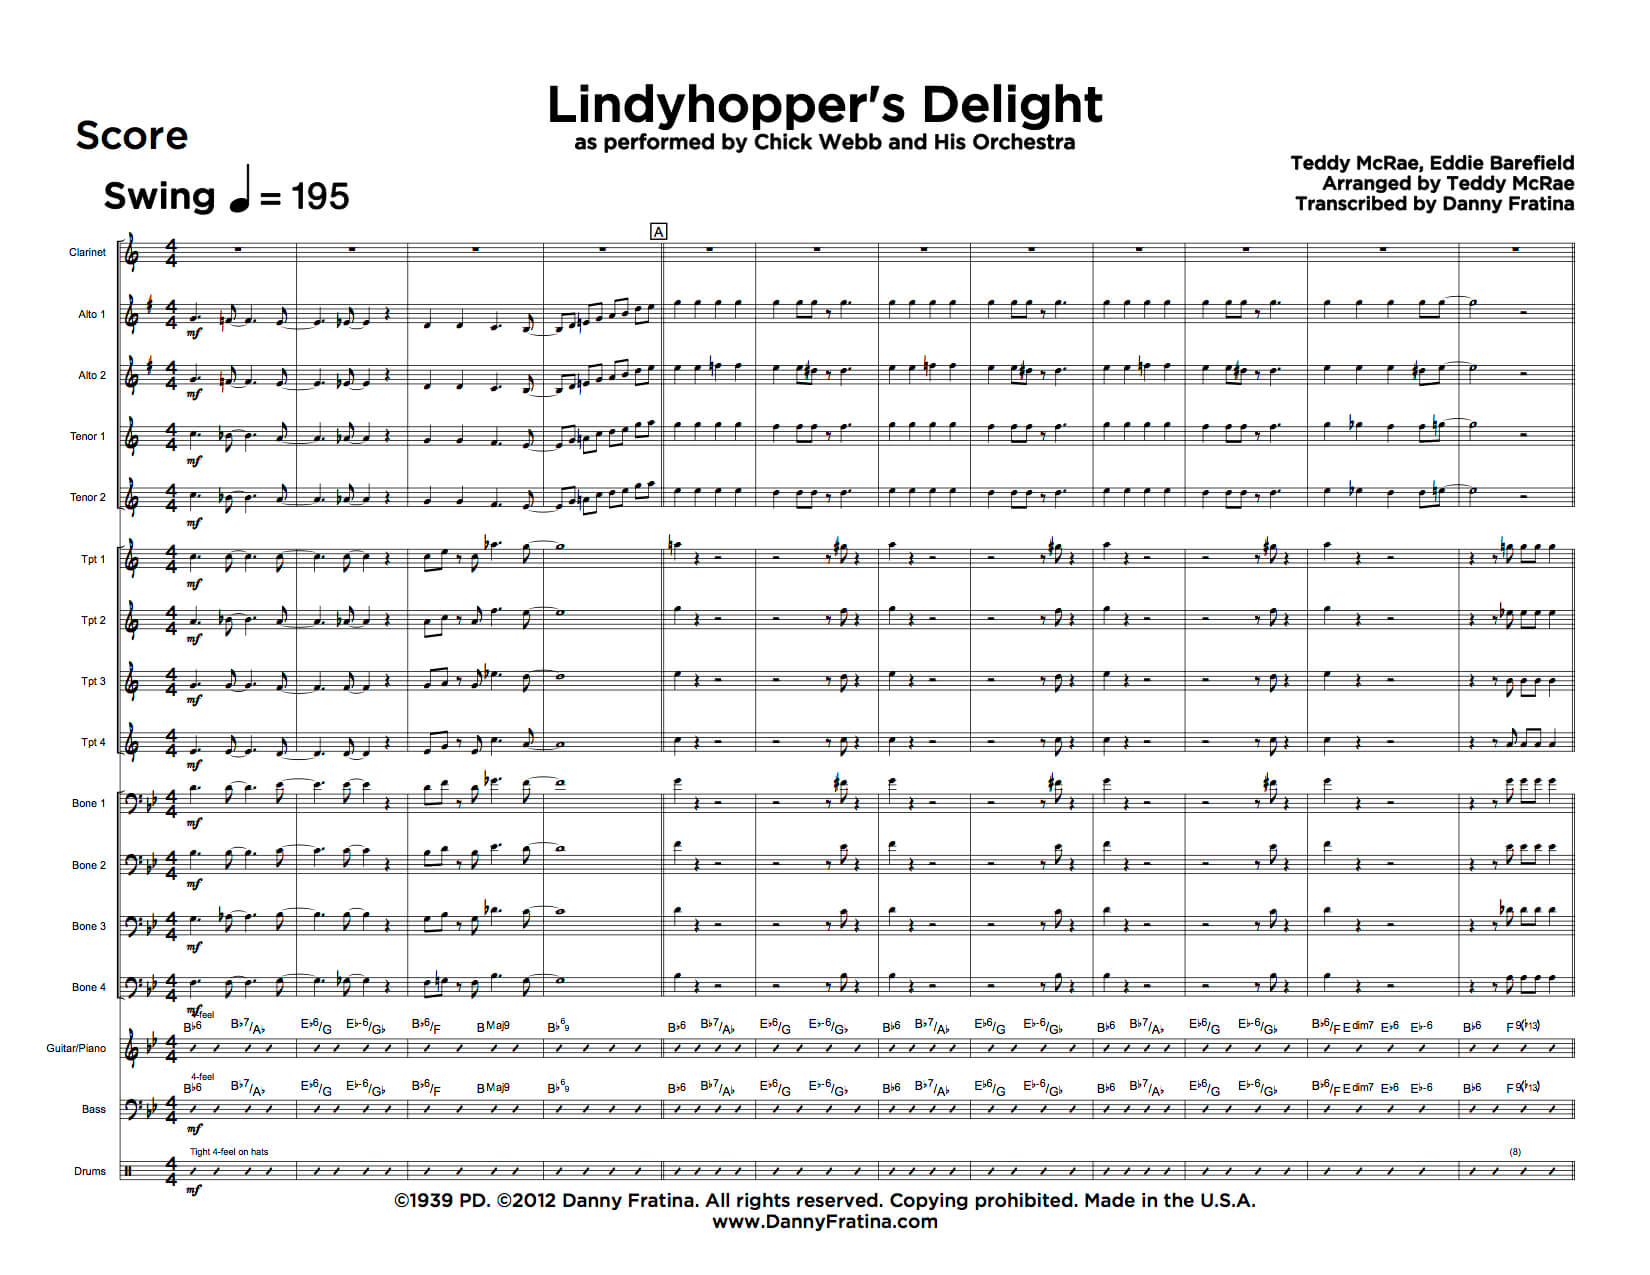
10. Always credit the composer, arranger, origin of cover, and year of work.
There are two sides here—one of respect and one of education, with education going two different ways.
Regarding respect—I’m still shocked by the fact that very close to 100% of the music I play out in the world doesn’t fully credit the composer/lyricist, arranger, and original band. This unfortunately includes professionally published music. The worst I’ve seen, which a larger publisher is constantly and irredeemably guilty of, is crediting the house transcriber as the original arranger. Do. Not. Do. This. Always give proper credit and honor the greats that came before you.

A less obvious benefit to giving full credit is that you learn a lot and expand your base of knowledge in the search for information. As the transcriber or arranger, you have to go on a search to find that info. That process usually involves heavy Googling, and along the way you will improve your ability to harness the full power of search engines. If you search All of Me, you’ll get a ton of results for John Legend, but search “all of me” -legend will strip away the information you know you don’t need.
You’ll also find resources that will provide years of information and assistance. Did you know most of the copyright catalogs of the 20th century are scanned and (mostly) searchable online? Have you used the search engine on the Harry Fox website? What about the search engine on the ASCAP website? Have you ever read through old out of print books on Google Books?
Your search for answers will make you a better amateur researcher, which is a skill that will grow over time and increase your value to others.
During your search, you’ll learn about composers and their lives. You’ll learn about arrangers and the interesting smaller projects they quietly worked on.
Giving full credit is about more than respect—it makes you a more learned artist.
Finally, crediting the original band that performed the piece you transcribed can actually help your band a bit. If it’s a Count Basie song, indicating it as such will help your piano player know how best to comp and give your horn players an idea of how much to overplay the dynamic differences. If it’s a Buddy Rich piece, telling your band on the page helps your drummer know that they can play more actively and expect more fills and setups.
Adding a year makes a big difference as well. Players like to know what era a song originated from. They also like to know the year of the specific arrangement. If you’ve transcribed a Duke Ellington chart from 1933 and one from 1964, a knowledgable player will use that information to adjust their playing in many subtle ways. The drummer might use a different hi hat sound. Trumpet players might adjust the way they articulate. The bassist might play a 4-feel in a totally different way.
This is information that takes longer to add, because some pieces send you on a wild goose chase around the internet, but it’s always worth it to show respect, increasing your pool of knowledge, and help your players get that slight advantage over a new chart.
———————
Almost all of these adjustments take seconds to make and in many cases can be added to your master templates so you never have to think about them again. Make those changes now, and make habits out of the others to truly level up your chart making game.
Leave A Comment